Showing posts with label free pattern. Show all posts

Cross Stitch: Christmas All the Trimmings SAL by Fat Quarter Shop plus FREE pattern changes

Hello!

Long time, no blog! Life has been full of all sort of surprises and challenges lately. Can I get an "amen"? 

Ann Dreyer Designs All The Trimmings SAL free cross stitch pattern

In 2018, I tip-toed back into cross stitching and last year, I dived right in the deep end. I've completed a handful of adorable projects and have met so many amazing new friends on Instagram. Come visit me over there!

So last month I jumped right into the free, mystery stitch-along from Fat Quarter Shop titled All the Trimmings. You can see the gorgeous, full pattern HERE on their blog. So adorable and fun. The original calls for black aida and since I stitch mostly in the evening, my eyes weren't happy about that!

Well I wanted to start with everyone but needed to use stash that I had on hand. Early in the summer I randomly went to a garage sale and snagged 2 huge bins of cross stitch stuff (patterns, floss, fabric, hoops) for $20!!!! I dug through the fabric and there was a brand new piece of pink aida. Could I make it work? The pattern was traditional red and greens with turquoise. Hmmm.... maybe if I change the red to dark pink? And put it on the pink fabric?

Why not give it a try?


Sweet people on the Instagram seemed to like the pink and FQS even shared one of my posts!

Ann Dreyer Designs All The Trimmings SAL free cross stitch pattern DMC color choices
DMC color numbers

The DMC colors I selected were 603, 906, 907, 964, 169, 168, and B5200 white. 
 

Ann Dreyer Designs All The Trimmings SAL free cross stitch pattern gingham stocking
I made made a gingham stocking

I made a few changes on the stockings, but when I got to the rows of bows and trees, I knew I needed to put the bows on the trees just like my mom did. She was the best bow maker! I added "Joy to the World" in the middle because we desperately need it right now. The font I used to design that is from Lord Libidan and his font collection found HERE. So many good ones there.
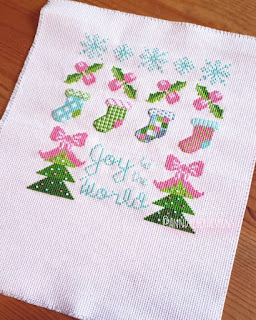
Ann Dreyer Designs All The Trimmings SAL free cross stitch pattern Joy to the World lettering
Joy to the World


A sweet, new friend and I tried guessing what the design would be each week and she thought there might be a row of ornaments. Well I HAD to add those. After a few evenings of pencil and graph paper, I came up with a design and stitched it up. I think it turned out cute! 

old school graph paper


Here it is if you want to try! (Free, but still copyrighted by Ann Dreyer Designs please.) 

Ann Dreyer Designs All The Trimmings SAL free cross stitch pattern ball ornament garland
 

CLICK HERE for PDF link for ball ornament garland.

And lastly, I tried my hand at making snowflakes. Haha! One day, I'll learn to not complicate things and leave well enough alone. 

Ann Dreyer Designs All The Trimmings SAL free cross stitch pattern snowflake addition
 

CLICK HERE for PDF link for snowflake pattern.

Ann Dreyer Designs All The Trimmings SAL free cross stitch pattern
 

Let me know if you try them! Now to figure out how to fully finish this one!!!

Ann Dreyer Designs All The Trimmings SAL free cross stitch pattern


:) Ann


Ann Dreyer Designs All The Trimmings SAL free cross stitch pattern Christmas tree

Simple Market Bag free crochet pattern


I ventured out to the Walmart a few weeks ago to wander around. The craft section looked like it had been hit by a tornado. Understandable. There were a handful of skeins of yarn, but mostly thick, wooly, wintery ones. 

Tucked in the back of a lower shelf sat hidden 3 bright yellow balls of sunshine! I didn't know what I was going to do with them, but I needed a little crafty pick-me-up and these did the trick!

happy yellow color

When I got home, I thought, "hmmmm, I should make a mesh-like tote bag to take to the store when I only need a few things. That way I won't have to touch the cart cooties!" 

A quick PINTEREST search came up with a few patterns, but on closer inspection, they were complicated. I needed easy. So I made my own pattern. Here it is! 

Let me know if you make one or if you see any mistakes. I just kinda winged it and wasn't fussy about gauge, size, numbers, etc. 

It's a great size (12" x 16") and should work well at the store tomorrow.

*Affiliate links* the links below are affiliate links which means I earn a small commission if you purchase an item through them at no additional cost to you. 

vintage daisy button

Simple Market Bag

By Ann Dreyer Designs


Materials:

  • Yarn: 3 skeins of Peaches & Cream cotton in Sunshine (it would also be super soft in Lion Brand Yarn's 24/7 cotton)

  • Hook: size H (I'm loving my new Clover Soft Touch hooks!)

  • Needle and embroidery floss or thread to sew on handles
  • 2 decorative buttons

Notes:

  • Pattern is in US terms.

  • Bag is worked bottom up.

  • I recently learned how to make a foundation cord from THIS video from Outstanding Crochet. It’s so easy and is a great strong, hole-free way to begin the bottom of this bag as well. My market bag begins with a foundation cord and then single crochets are worked across 1 edge, then the piece is rotated 180 degrees (not turned like in normal row crochet) and single crochets are worked across 2nd edge.

  • Handle is worked separately and then sewn on with embroidery floss.

  • Bag is worked in rounds and handle is worked in rows.

mesh detail

Stitches:

  • SC = single crochet

  • SL ST = slip stitch

  • Ch = chain

  • BLO = back loop only

  • DC = double crochet 

For bag (measures approx. 12" wide by 16" tall):

Make a foundation cord of 40 chains (see video linked above).

Round 1 - SC across, 3 SC in last stitch, rotate 180 degrees and SC across, 3 SC in last stitch, SL ST to 1st SC, Ch. 1.

Round 2 - SC around in BLO, SL ST to 1st SC, Ch. 1.

Rounds 3-5 - repeat round 2. At the end of round 5, Ch. 3.


Start of “mesh”:

Round 6 - [skip 1, DC in next stitch, Ch. 1] repeat around ending with SL ST in top of 2nd chain of Ch. 3, Ch. 3. 

Rounds 7-24 - [DC in next Ch. 1 space, Ch. 1] repeat around ending with SL ST in top of 2nd chain of Ch. 3, Ch. 3 (on round 24, only Ch. 1). (In the pic below, the arrow shows where I put the DC after the first Ch. 3.)


place DC IN chain 1 space

Top border:

Round 25 - SC in each DC and Ch. 1 around, SL ST to Ch. 1, Ch. 1.

Rounds 26-29 - SC around in BLO, SL ST to Ch. 1, Ch. 1.


Finish off. Weave in ends.


Handle (measures approx. 30" long):

Make a foundation cord of 105 chains (feel free to adjust number to make handle longer or shorter).

Rows 1-4 - SC in BLO across, Ch. 1, turn.


Finish off. Weave in ends.


Attach handle:

With coordinating embroidery floss or sewing thread, sew handle to bag. Add embellishments. Enjoy!


finished bag

I hope you liked this pattern and found it simple and fun. Click on an image to Pin for later! Thanks!

:) Ann